Optical Network Terminals (ONTs) are devices that convert fiber optic signals to Ethernet signals that can be handled by typical routers. As the connection between home and business networks to internet service providers’ (ISPs) fiber-optic networks, they’re often loaded with custom firmware with ISP-specific configurations and passwords.
Sites like Hack GPON and Hacking RTL960x document how to gain access to a multitude of ONT models. There’s even a blogpost on how to access Singtel’s ZTE ZXA10 F620G via telnet or web console.
Recently, I switched internet subscriptions and no longer needed my Link-All LAU-G150-C ONT. Since the model is not documented anywhere, I thought this was a great opportunity to practice some hardware hacking.
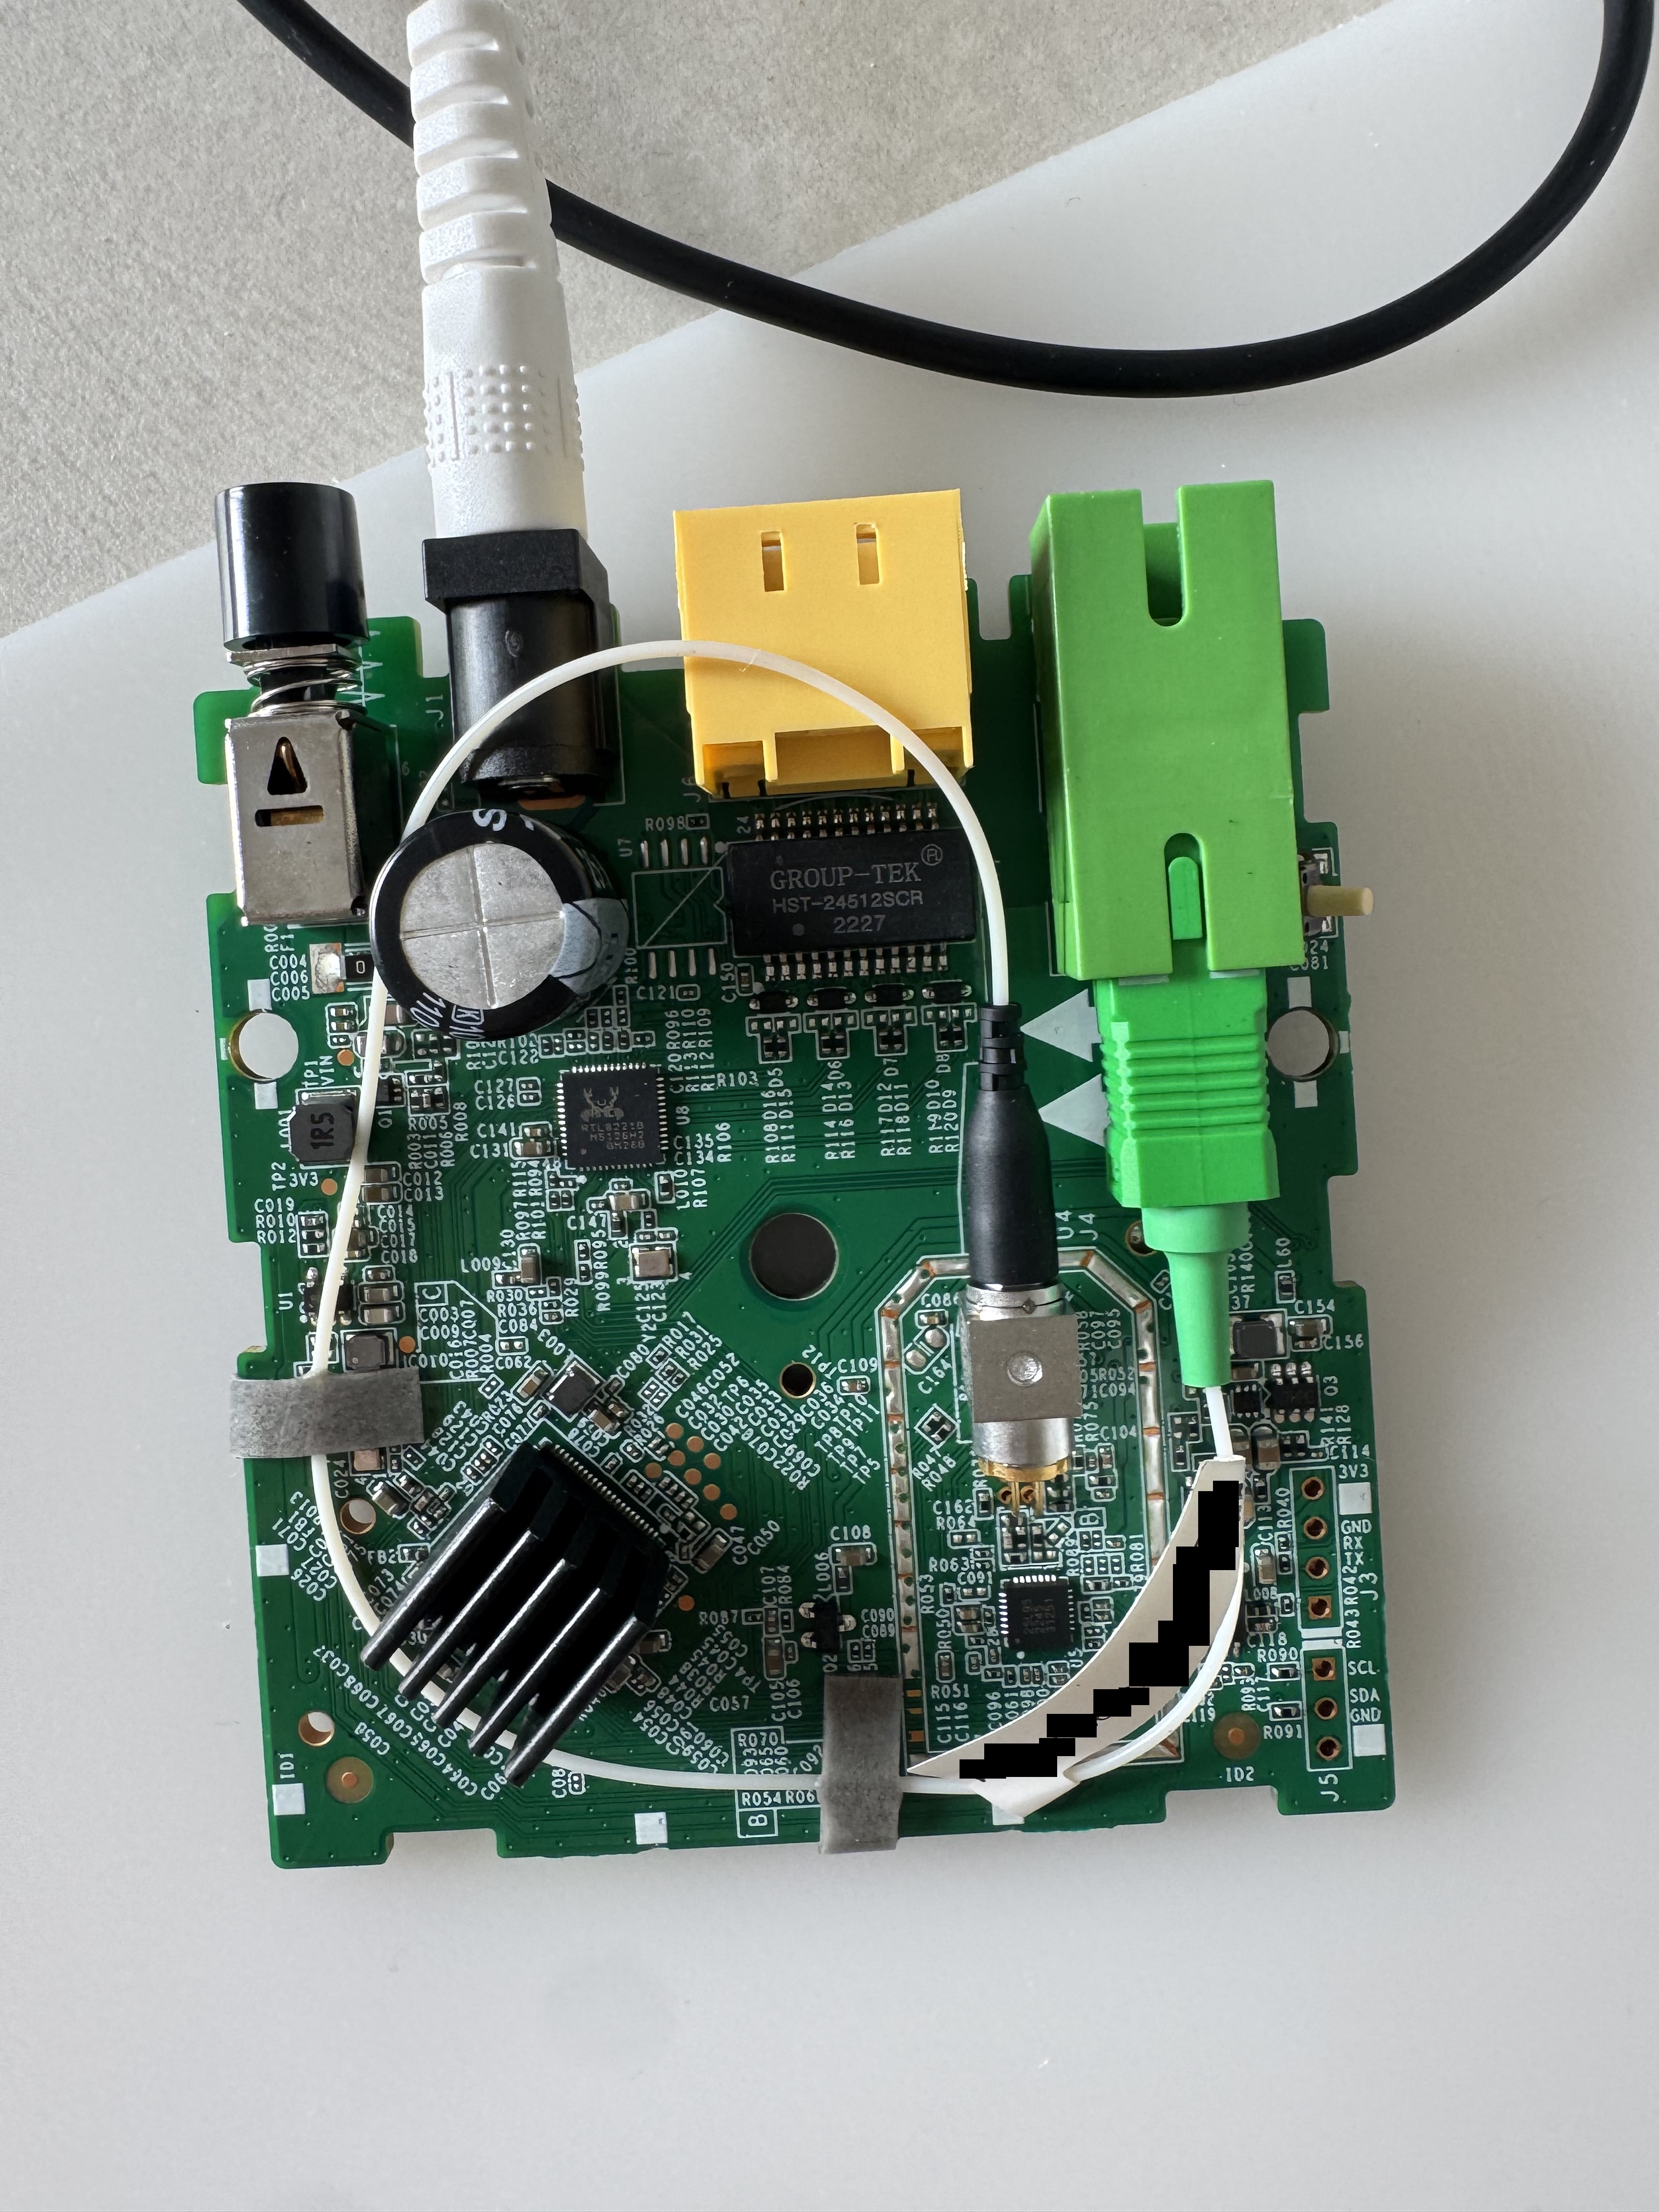
The LAU-G150-C looks extremely similar to the Huawei HG8010H with one Passive Optical Network (PON) input port, one ethernet output port, and a simple power button.
However, unlike many of the models documented on Hack GPON, the LAU-G150-C appeared to be reasonably hardened. I first connected to it directly over ethernet and tried the typical hard-coded static IPs like 192.168.100.1 and 192.168.10.1 (ONTs typically don’t serve DHCP) but could not find any exposed ports or ping the device.
As such, I decided to look for a hardware interface. It took significant effort to pry the cover off and I realised belatedly that there was a screw hidden underneath a sticker that was causing all this trouble.
Hardware hacking hot tip #1: Check for hidden screws under stickers!
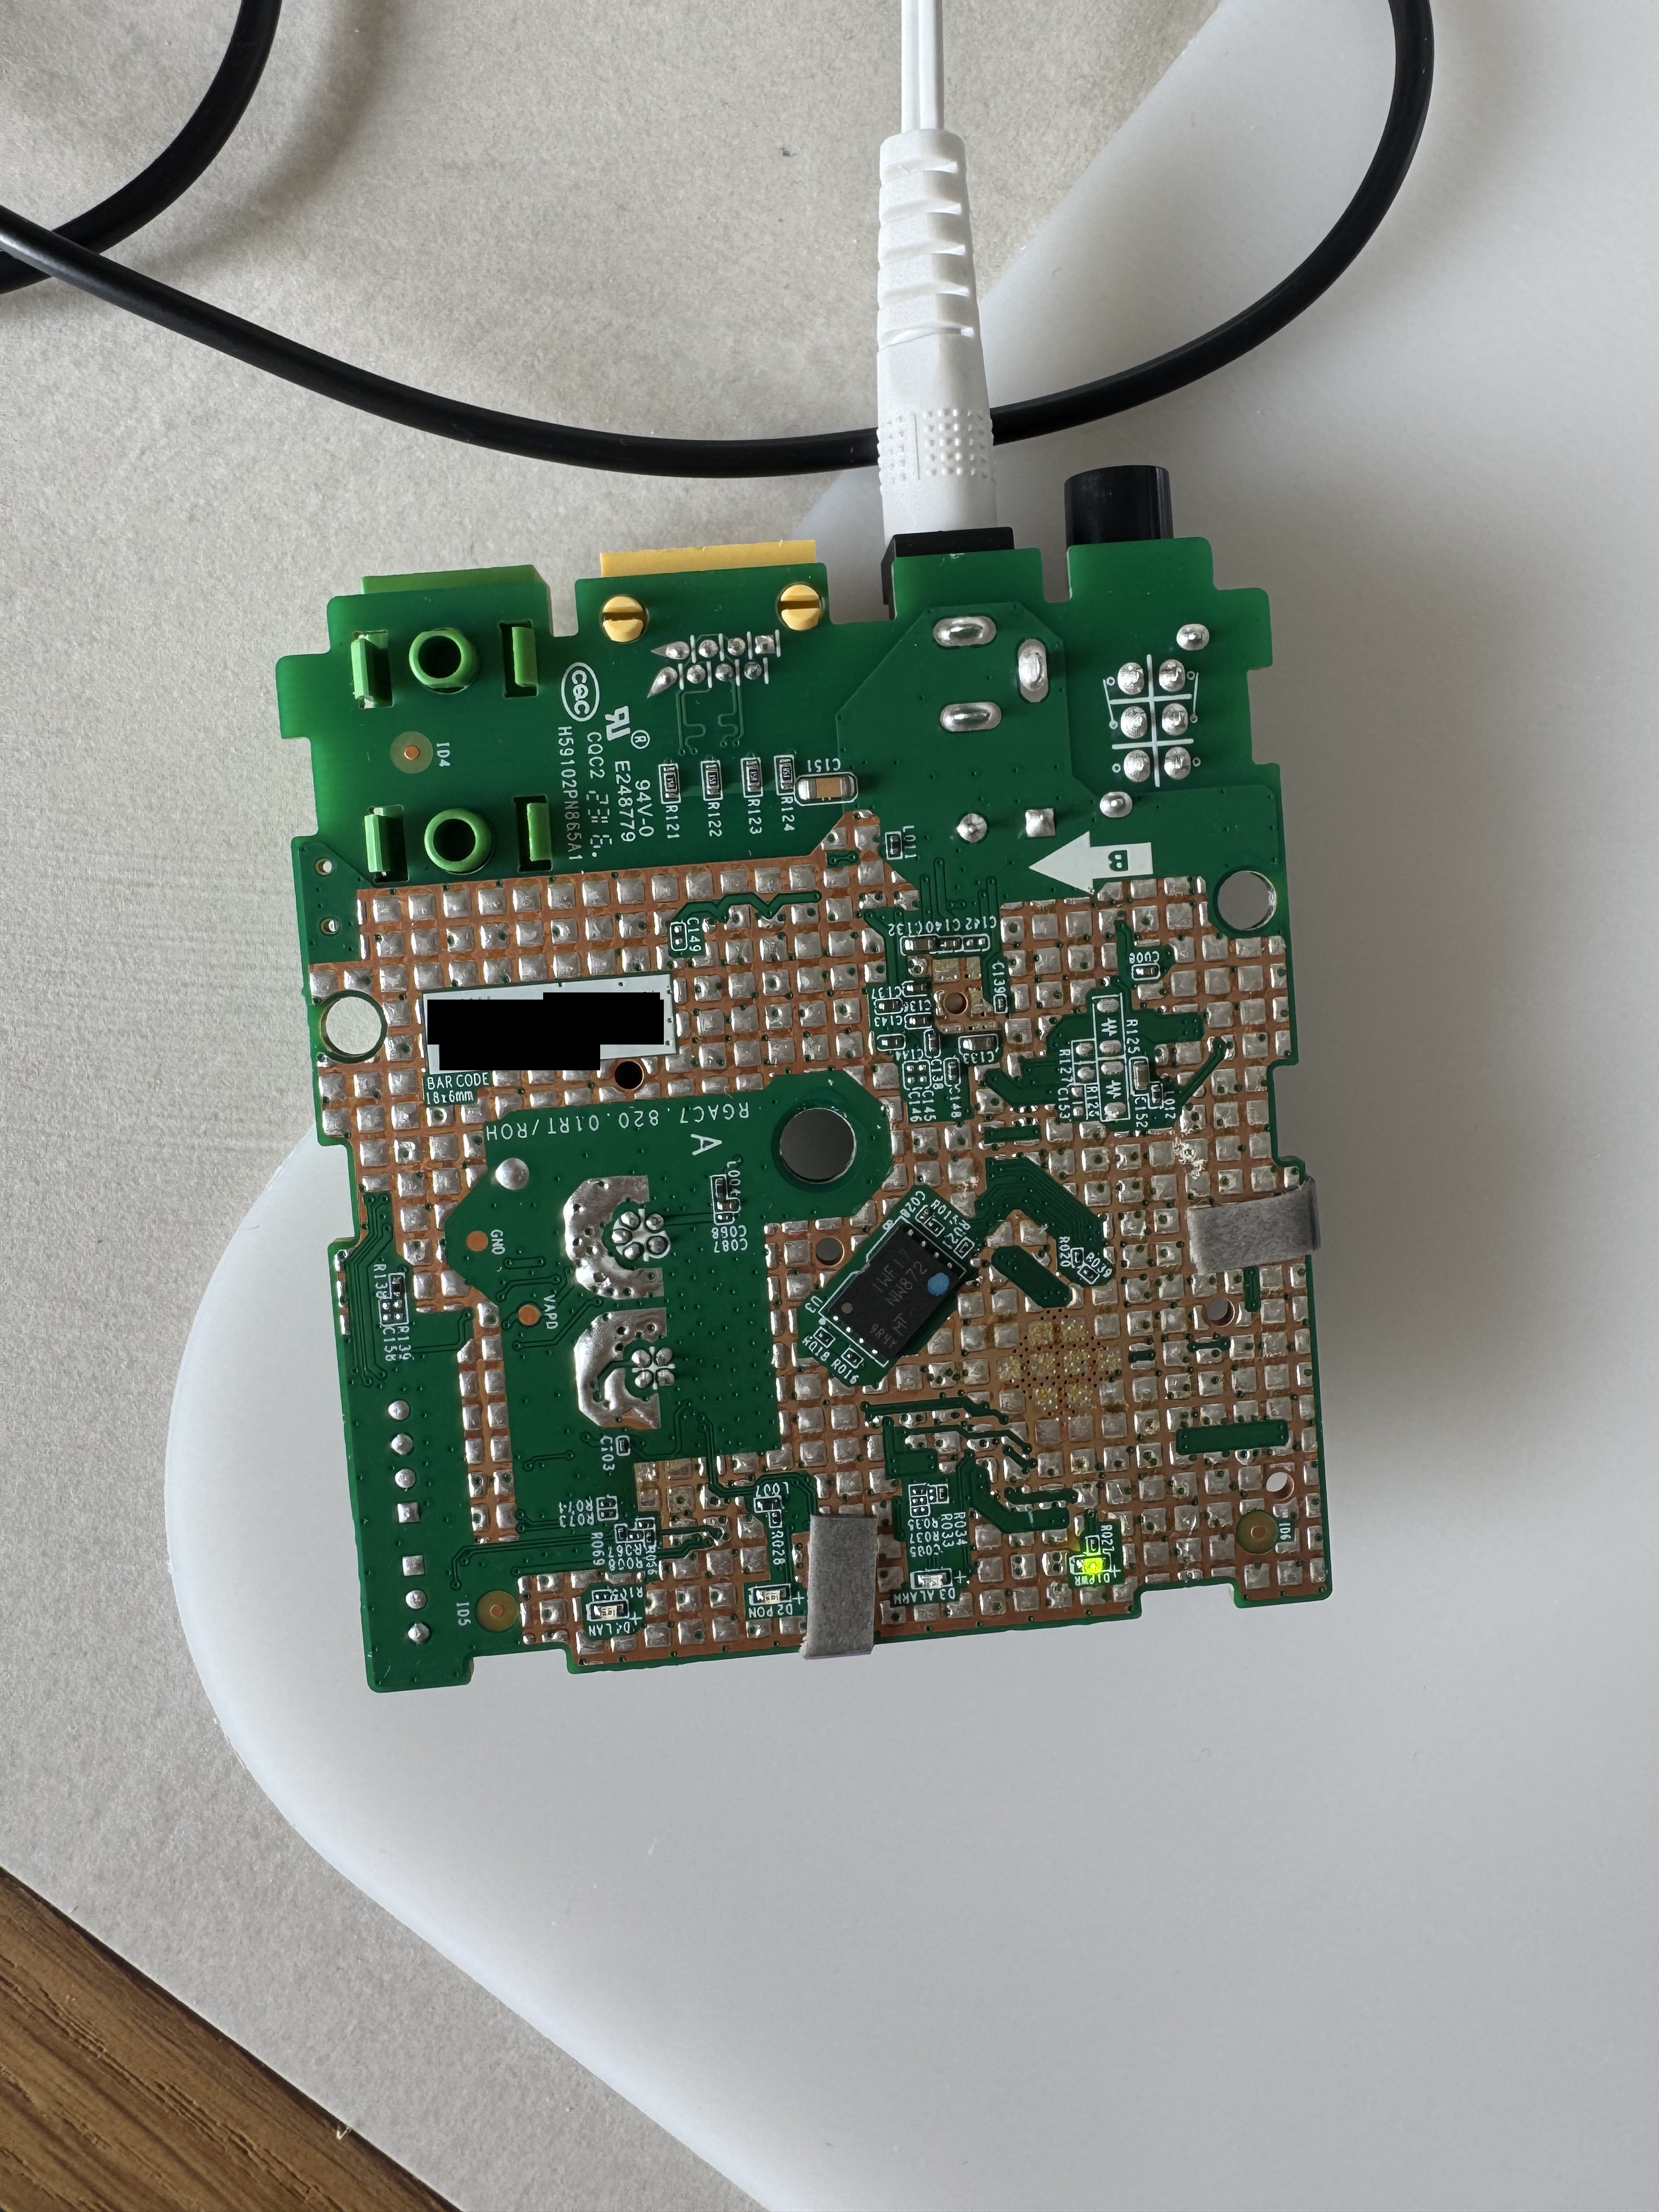
After all that hard work, I was rewarded with a juicy teardown!


While I was able to identify most of the components, the processor (hidden under the heat sink in on the bottom left of the top view) was unlabelled. This made it difficult to figure out if there were any debug interfaces I could target.
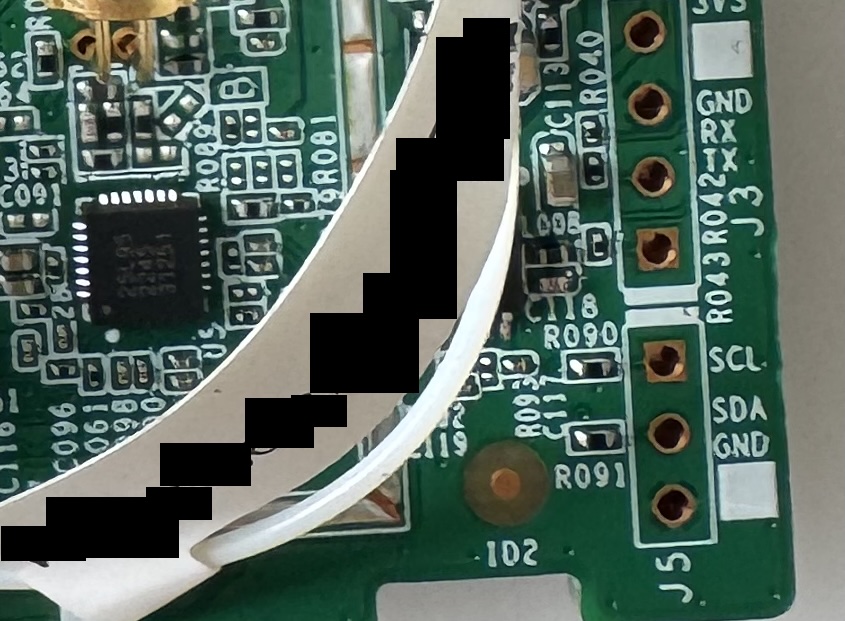
Fortunately, a closer look at the board revealed some interested ports…

The ports labelled GND, RX, and TX suggested that a potential UART interface, while SCL and SDA indicated a potential I2C interface.
I got to work with the multimeter and confirmed the ground ports, but the readings for the RX port seemed off. Worse, when I tested the ports with a logic analyzer, I got complete gibberish! Typical baud rates for other ONTs like 115200 Hz failed to reveal anything.
A day later, I realised my mistake: I had been trying to analyze the signals one port at a time. It was only when I connected the ground and RX ports at the same time that I got recognisable data at 115200 Hz. Great success!
Hardware hacking hot tip #2: Don’t analyze serial interface ports in isolation!
When powering the device on, it would first expose the bootloader:
9601D
PRELOADER Bismarck 3.5
II: LPLR:1012, PLR:9aa5a8d9, Build_date:21080422, Toolkit:rsdk-1.5.6-5281-EB-2.6.30-0.9.30.3-131105
II: Disable OCP Timeout Monitor
II: Disable LX Timeout Monitor
II: TLB initial done:
    .ro section works!
    .text and .ro sections work!
EE: REG32(0xbb000044)[3:2]:0x2 !=0
II: Enable Triple Synchronizer
II:cg_cpu_clk_init done
II: CPU 300MHz (600/2/0), MEM 325MHz, LX 200MHz, SPIF 25MHz
AK: DRAM AUTO CALIBRATION(20210202)
AK: ZQ Calibration Passed
AK: ZQ Calibration Passed
AK: ZQ Calibration Passed
AK: ZQ Calibration Passed
AK: MR0: 0x00100952
AK: MR1: 0x00110040
AK: MR2: 0x00120000
AK: MR3: 0x00130000
AK: clear dwdqor

AK: Bit/max_r_s/max_r_l/max_w_s/max_w_l    Bit/max_r_s/max_r_l/max_w_s/max_w_l(Hex)
   [ 0]       0      1f       0      17   [16]       0      1f       0      17
   [ 1]       0      1f       0      17   [17]       0      1f       0      17
   [ 2]       0      1f       0      15   [18]       0      1f       0      15
   [ 3]       0      1f       0      15   [19]       0      1f       0      15
   [ 4]       0      1f       0      17   [20]       0      1f       0      17
   [ 5]       0      1f       0      15   [21]       0      1f       0      17
   [ 6]       0      1f       0      17   [22]       0      1f       0      17
   [ 7]       0      1f       0      17   [23]       0      1f       0      17
   [ 8]       0      1f       0      17   [24]       0      1f       0      17
   [ 9]       0      1f       0      19   [25]       0      1f       0      19
   [10]       0      1f       0      17   [26]       0      1f       0      19
   [11]       0      1f       0      19   [27]       0      1f       0      19
   [12]       0      1f       0      19   [28]       0      1f       0      19
   [13]       0      1f       0      19   [29]       0      1f       0      19
   [14]       0      1d       0      1b   [30]       0      1f       0      1b
   [15]       0      1f       0      17   [31]       0      1f       0      17
AK: DQ enable delay sync with DQ delay tap.
    0xb80015D0=0x07070707, 0xb80015D4=0x07070707, 0xb80015D8=0x08070807, 0xb80015DC=0x07090808

AK: DRAM size = 0x2000000
AK: Disable read after write function

AK: Support tREFI divided by 4

AK: dram auto calibrtaion is done
II: MEM_PROBE_OK
II: MEM_XLAT_OK
II: MEM_TO_REG_OK
II: MEM_CAL_OK
II: Change Stack from 0x9f00375c to 0x806fffe0
II: U-boot Magic Number is 0x27051956
II: Inflating U-Boot (0x80700040 -> 0x81c00000)… OK
II: Starting U-boot…


U-Boot 2011.12.NA-svn35647 (Aug 04 2021 - 22:50:21)

Board: RTL9601D, CPU:300MHz, LX:200MHx, MEM:325MHz, Type:DDR2
DRAM: 32 MB
SPI-NAND Flash: 2C14/Mode0 1x128MB
Create bbt:
Loading 16384B env. variables from offset 0xc0000
Loading 16384B env. variables from offset 0xe0000
Loaded 16384B env. variables from offset 0xc0000
Net:   LUNA GMAC
Warning: eth device name has a space!

Hit any key to stop autoboot:  1
This revealed important information like the board (RTL9601D) and SPI-NAND flash storage.
If the autoboot wasn’t interrupted, it then proceeded to the actual Linux operating system:
## Booting kernel from Legacy Image at 81000000 …
   Image Name:   Linux Kernel Image
   Created:      2024-10-16   8:49:19 UTC
   Image Type:   MIPS Linux Kernel Image (lzma compressed)
   Data Size:    909109 Bytes = 887.8 KB
   Load Address: 80000000
   Entry Point:  80000000
   Verifying Checksum … OK
   Uncompressing Kernel Image … OK

Starting kernel …

...

BusyBox v1.12.4 (2024-10-16 16:46:28 CST) built-in shell (ash)
Enter ‘help’ for a list of built-in commands.

#
Shell unlocked!
While a UART shell granted a lot of visibility, I still wanted to understand why I couldn’t ping the device directly over the network connection.
I checked for exposed network interfaces:
# ip addr
1: lo:  mtu 16436 qdisc noqueue state UNKNOWN
    link/loopback 00:00:00:00:80:05 brd 00:00:00:00:00:00
    inet 127.0.0.1/8 scope host lo
2: eth0:  mtu 1500 qdisc pfifo_fast state UNKNOWN qlen 1000
    link/ether > brd ff:ff:ff:ff:ff:ff
3: eth0.2:  mtu 1500 qdisc noop state DOWN qlen 1000
    link/ether 00:00:00:01:00:02 brd ff:ff:ff:ff:ff:ff
4: eth0.3:  mtu 1500 qdisc noop state DOWN qlen 1000
    link/ether 00:00:00:01:00:02 brd ff:ff:ff:ff:ff:ff
5: nas0:  mtu 1500 qdisc pfifo_fast state DOWN qlen 1000
    link/ether 00:00:00:01:00:02 brd ff:ff:ff:ff:ff:ff
6: pon0:  mtu 1500 qdisc noop state DOWN qlen 1000
    link/ether  brd ff:ff:ff:ff:ff:ff
7: br0:  mtu 1500 qdisc noop state DOWN
    link/ether  brd ff:ff:ff:ff:ff:ff
8: nas0_0:  mtu 1500 qdisc pfifo_fast state UNKNOWN qlen 10
    link/ether  brd ff:ff:ff:ff:ff:ff
Interestingly, the ethernet interface eth0 didn’t have an IP address set, but doing so manually using ip addr add 192.168.100.1/24 dev eth0 still failed to make it reachable.
When I monitored the connection using Wireshark on my connected laptop, I realised that pinging out from the ONT to my laptop worked – but even though my laptop responded to the ping, the ONT didn’t seem to receive the packet.
My next instinct was to check for firewall rules with iptables:
# iptables -L
Chain INPUT (policy ACCEPT)
target     prot opt source               destination
DROP       tcp  —  anywhere             anywhere           tcp dpt:http
DROP       udp  —  anywhere             anywhere           udp dpt:http
DROP       tcp  —  anywhere             anywhere           tcp dpt:telnet
DROP       udp  —  anywhere             anywhere           udp dpt:telnet
ACCEPT     udp  —  anywhere             anywhere           udp dpt:router
DROP       all  —  anywhere             239.255.255.250
ACCEPT     all  —  anywhere             224.0.0.0/4
dhcp_port_filter  all  —  anywhere             anywhere

Chain FORWARD (policy ACCEPT)
target     prot opt source               destination
TCPMSS     tcp  —  anywhere             anywhere           tcp flags:SYN,RST/SYN TCPMSS clamp to PMTU
TCPMSS     tcp  —  anywhere             anywhere           tcp flags:SYN,RST/SYN tcpmss match 1452:1536TCPMSS set 1452

Chain OUTPUT (policy ACCEPT)
target     prot opt source               destination

Chain dhcp_port_filter (1 references)
target     prot opt source               destination
While this was interesting (iptables rules dropped telnet and http), it didn’t answer the question why ICMP (used for ping) was failing.
After some ChatGPT consultation, I was prompted (lol) to check ebtables (which controls Layer 2 filtering) instead:
# ebtables -L
Bridge table: filter

Bridge chain: INPUT, entries: 1, policy: ACCEPT
-j br_wan

Bridge chain: FORWARD, entries: 1, policy: ACCEPT
-j portmapping

Bridge chain: OUTPUT, entries: 1, policy: ACCEPT
-j br_wan_out

Bridge chain: br_wan, entries: 1, policy: RETURN
-i nas0_0 -j DROP

Bridge chain: br_wan_out, entries: 1, policy: RETURN
-o nas0_0 -j DROP

Bridge chain: portmapping, entries: 9, policy: ACCEPT
-i nas0_0 -o eth0.2 -j RETURN
-i eth0.2 -o nas0_0 -j RETURN
-i eth+ -o eth+ -j RETURN
-i eth+ -o wlan+ -j RETURN
-i wlan+ -o eth+ -j RETURN
-i wlan+ -o wlan+ -j RETURN
-i eth0+ -j DROP
-i wlan+ -j DROP
-i nas0_0 -j DROP
This was the answer – -i eth0+ -j DROP was dropping all forwarding traffic received on the ethernet interface! This meant that while routers and other devices could communicate through the ethernet interface to the fibre-optic interface, they couldn’t use it to communicate with the ONT directly. I could clear this obstacle with a simple ebtables -F and iptables -F to flush all the filtering rules.
Hardware hacking hot tip #3: Inspect all network filtering rules for potential hardening!
Another gotcha was that according to the ip addr output, br0 and eth0 were sharing the same MAC address. In short, network traffic was bridged and IP layer traffic would be handled by br0. Thus, I needed to set the static IP address on br0 instead of eth0 and bring it up:
ip addr add 192.168.100.1/24 dev br0
ip link set br0 up
Once this was done, I could now ping and perform any other network communication with the ONT over the ethernet connection.
Next, I performed a bit of reconaissance to understand the running.
# ps
  PID USER       VSZ STAT COMMAND
    1 admin      892 S    init
    2 admin        0 SW<  [kthreadd]
    3 admin        0 SWN  [ksoftirqd/0]
    4 admin        0 SW<  [events/0]
    5 admin        0 SW<  [khelper]
    8 admin        0 SW<  [async/mgr]
   51 admin        0 SW<  [kblockd/0]
   64 admin        0 SW   [netlog]
   69 admin        0 SW   [pdflush]
   70 admin        0 SW   [pdflush]
   71 admin        0 SW<  [kswapd0]
   89 admin        0 SW<  [mtdblockd]
  158 admin        0 SW<  [yaffs-bg-1]
  171 admin     2064 S    configd
  354 admin    24292 S    omci_app -s  -f off 0 -m disable -d err -
  363 admin     1696 S    /bin/pondetect
  562 admin      900 R    -/bin/sh
  563 admin      592 S    /bin/inetd
  572 admin     2848 S    /bin/hiproc
  574 admin        0 DW<  [led_swBlink]
  610 admin    24292 S    omci_app -s  -f off 0 -m disable -d err -
  611 admin    24292 S    omci_app -s  -f off 0 -m disable -d err -
  612 admin    24292 S    omci_app -s  -f off 0 -m disable -d err -
  708 admin    24292 S    omci_app -s  -f off 0 -m disable -d err -
  709 admin    24292 S    omci_app -s  -f off 0 -m disable -d err -
  710 admin    24292 S    omci_app -s  -f off 0 -m disable -d err -
  711 admin    24292 S    omci_app -s  -f off 0 -m disable -d err -
  820 admin      892 R    ps
Checking the strings for the binary files suggested that hiproc was responsible for the web console (HTML-related strings), but due to the limited binaries available on Busybox, I had to manually check /proc to see which port it was on:
# cat /proc/572/net/tcp
  sl  local_address rem_address   st tx_queue rx_queue tr tm->when retrnsmt   uid  timeout inode
   0: 00000000:9CC3 00000000:0000 0A 00000000:00000000 00:00000000 00000000     0        0 835 1 80f36880 300 0 0 2 -1
   1: 00000000:0017 00000000:0000 0A 00000000:00000000 00:00000000 00000000     0        0 840 1 80f36040 300 0 0 2 -1
In this case, 9CC3 converted to decimal was 40131! I excitedly accessed the port on a browser, and…

The response still revealed important information like the server version:
HTTP/1.0 403 Forbidden
Date: Thu, 01 Jan 1970 00:17:14 GMT
Server: Boa/0.93.15
Connection: close
Content-Type: text/html

<HTML><HEAD><TITLE>403 ForbiddenTITLE>HEAD>
<BODY><H1>403 ForbiddenH1>
Your client does not have permission to get URL / from this server.
BODY>HTML>
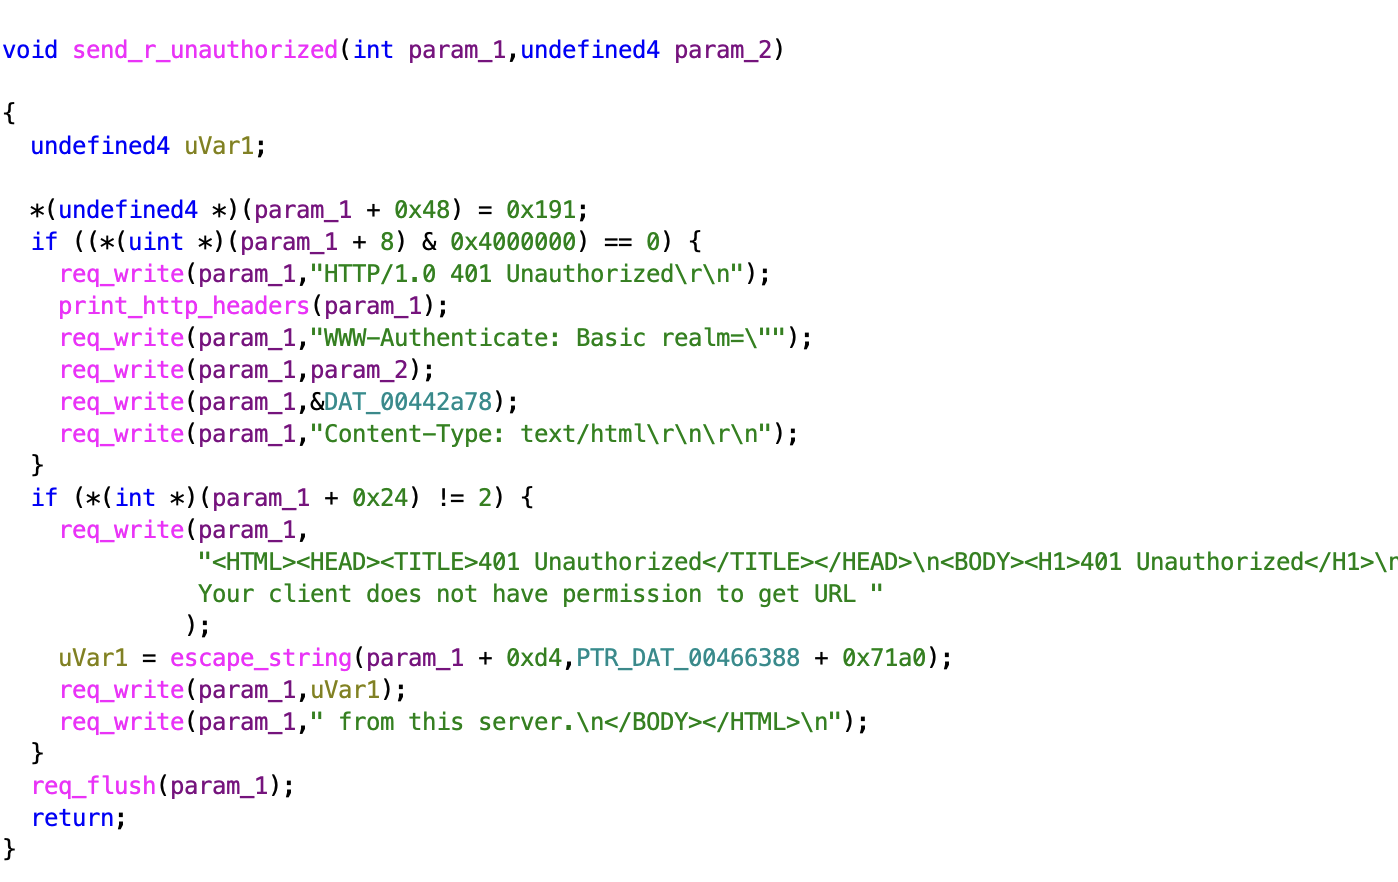
Pushing on, I transferred the hiproc binary out using netcat for futher analysis. I started from the Your client does not have permission to get URL string, then traced back any references in Ghidra.

After a bit of spelunking, I realised that while the web console had been pretty much disabled (it wasn’t referencing any configuration files), it was using /etc as the server root, allowing me to access files like /etc/passwd by browsing directly to it. Nevertheless, this wasn’t too interesting because I already had shell access.
After extracting all the config files and binaries, there’s a lot more to reverse engineer and analyze, but for now I feel pretty satisfied with getting access to a previously-undocumented ONT device. I hope to publish a couple more mini hardware hacking blogposts with practical tips to make it easier to get into this domain of research.
