- Introduction: The Need for a Scalable, Automated Simulation Range
- The Solution Architecture: Ludus + Elastic
- Component 1: The Foundation (Ludus)
- Component 2: The Targets (The Labs)
- Component 3: The Sensor Grid (Elastic Agent & Defend)
- Component 4: The Brain (Elastic Cloud Hosted / Elastic Serverless)
- Phase 1: Building and Instrumenting the Range
- 3.1 Configuring the Elastic Agent Policy (in Kibana)
- 3.2 The Ludus YAML Configuration (ludus.yml)
- &
- ""&

Introduction: The Need for a Scalable, Automated Simulation Range
In modern security operations, detection engineering is no longer a “set it and forget it” discipline. The central challenge for any security team – and the question that underpins the entire purple-team approach is simple: how do you know whether your detection rules genuinely work? Continually validating detection logic against an ever-shifting adversary toolkit is now a fundamental requirement.
Arguably, the largest hurdle for this exercise has always been setting up the lab. Manually provisioning a multi-domain Active Directory forest, configuring it with specific vulnerabilities, and deploying a separate, contained malware analysis environment is a complex and time-consuming process. This repetitive setup work is a significant drain on an organization’s most valuable resource: the time of its senior security analysts. Community discussions echo this frustration, highlighting the hours lost to manual setup before a single test can be run.
This blog details a modern solution that eliminates this bottleneck by combining rapid infrastructure automation with a unified security analytics platform. The solution leverages two key components:
- Ludus: An open-source automation overlay that deploys and configures complex, multi-VM cyber ranges from a single command.
- Elastic Security: The platform that unifies Security Information Event Management (SIEM), eXtended Detection and Response (XDR), and cloud security, providing a consolidated solution to ingest, detect, and respond to threats. It offers the “limitless visibility” required to observe every action within the simulated environment.
The goal of this guide is to provide a definitive, step-by-step blueprint for building this integrated system. It will show how to move from slow, manual, and inconsistent lab testing to a continuous, automated, and scalable detection-engineering workflow beyond what Elastic Cortado provides.
The Solution Architecture: Ludus + Elastic
This architecture represents a high-fidelity simulation of a modern hybrid enterprise. The Ludus range acts as the “on-prem” or IaaS data center, while the Elastic Cloud deployment represents the “SaaS” security stack. This model perfectly mirrors the hybrid and multi-cloud environments that Elastic Security is designed to protect, making the architecture of the test as valuable as the attacks themselves.
The build consists of the following core components.
| Component | Technology | Function | |
|---|---|---|---|
| Foundation (Infrastructure) | Ludus (Proxmox/Ansible) | Deploys VM ranges from a single YAML config. | |
| Targets | Identity – GOAD (Windows Server) Supply Chain – XZbot (Debian) | Multi-domain AD forest with intentional vulnerabilities (Kerberoasting, Print Nightmare). Linux host infected with CVE-2024-3094 for supply chain simulation. | |
| The Sensor Grid (Visibility) | Elastic Agent | Unified telemetry collection (EDR + Logs). | |
| The Brain (Analysis) | Elastic Security | SIEM/XDR platform for correlation and AI-driven investigation. |
Component 1: The Foundation (Ludus)
Ludus serves as the Infrastructure-as-a-Service (IaaS) layer. Built to run on Proxmox 8/9 or Debian 12/13, it uses YAML configuration files to define complex virtual networks, supporting up to 255 distinct VLANs. Behind the scenes, Ludus easily leverages Packer and Ansible to build, configure, and deploy the virtual machine templates from that single file.
Review and follow the installation steps and hardware requirements in the Ludus quick-start.
Component 2: The Targets (The Labs)
This guide merges two distinct Ludus environments into a single, comprehensive range to test a wider spectrum of threats:
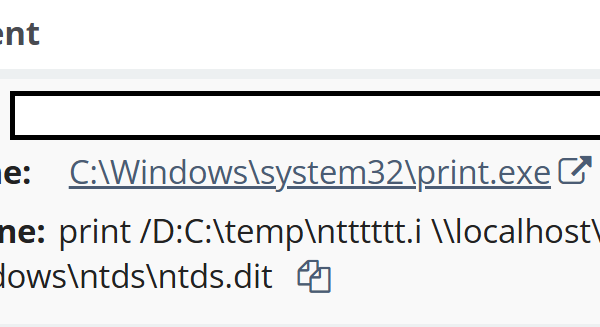
- Game of Active Directory (GOAD): A purpose-built Active Directory lab designed by security researchers at Orange Cyberdefense. It is pre-configured with the specific misconfigurations and vulnerabilities needed to simulate common identity-based attack paths, such as Kerberoasting, NTLM Relay, and Active Directory Certificate Services (ADCS) abuse.
- XZbot Malware Lab: A high-risk, high-fidelity malware environment. This lab contains the actual, functional CVE-2024-3094 backdoor. This provides a perfect, modern test case for a sophisticated software supply-chain attack.
Important Disclaimer
Handling live malware, even for research, can violate Acceptable Use Policies (AUPs) of ISPs or cloud providers. Ensure you own the infrastructure (Ludus is on-prem) and ensure your upstream ISP allows for such research, or route traffic through a VPN.
Component 3: The Sensor Grid (Elastic Agent & Defend)
To gain visibility, every virtual machine in the Ludus range across both GOAD and XZbot labs will be instrumented with Elastic Agent, a single, unified agent for data collection and protection (via Elastic Defend).
This instrumentation is automated via the badsectorlabs/ludus_elastic_agent Ansible role. This role is the critical lynchpin that programmatically bridges the infrastructure provisioning phase (Ludus/Ansible) with the security instrumentation phase (Elastic), enabling a true “infrastructure-as-code” workflow.
Crucially, the Elastic Agent policy will be configured with the Elastic Defend integration. This elevates the agent from a simple log collector to a full-powered Endpoint Detection & Response (EDR)/eXtended Detection & Response (XDR) solution, providing host-based detections (including Machine Learning (ML) driven malware and ransomware detection) and the deep, kernel-level telemetry essential for detection.
Note: For the purple team approach outlined in this blog, set policies to Detect mode.
Component 4: The Brain (Elastic Cloud Hosted / Elastic Serverless)
All security telemetry and alerts from the Elastic Agents in the Ludus range are streamed to a centralized Elastic Cloud Hosted (ECH) or Elastic Serverless deployment. This is where the unified platform’s analytical power comes to life. Using a cloud-native platform is not just for hosting; it is what unlocks Elastic’s most advanced, force-multiplying features, including Attack Discovery and the AI Assistant. Click here to start a trial on Elastic Cloud.
The diagram below provides an overview of the build, which is based on the GOAD lab.
Phase 1: Building and Instrumenting the Range
This section provides a technical, step-by-step guide to configuring and deploying the automated range. The process follows a clear “infrastructure-as-code” (IaC) model, where the security instrumentation is defined alongside the infrastructure itself, ensuring a consistent and repeatable monitoring posture for every deployment. The Elastic Cloud instance and its configurations can be managed with the Elastic Cloud and Elastic Stack Terraform provider for a full IaC model of the range and the SIEM.
3.1 Configuring the Elastic Agent Policy (in Kibana)
Before running the Ludus range deployment, the agent policy must be created in the Elastic Cloud instance. This policy is what enables the powerful EDR/XDR telemetry.
The operational flow is as follows:
- Log in to the Elastic Cloud (ECH) or Elastic Serverless Kibana instance.
- Navigate to Management > Fleet.
- Create a new Agent policy (e.g., “ludus-range-policy”). The ludus_elastic_agent role will enroll agents into the policy you specify in your VM-level customization or into the default policy linked to the global variable.
- Add the Elastic Defend integration to this policy.
- Configure the Elastic Defend integration to run in Detect mode. This activates the full suite of EDR telemetries.
- Save the policy and click “Add agent.” This will provide the Enrollment token (for ludus_elastic_enrollment_token) and Fleet server URL (for ludus_elastic_fleet_server) needed for the ludus.yml file.
- (Optional) Repeat steps 3-6 to create customized policies to align with the host’s functions and capabilities for VM-level customization of policies.
Once this policy is created and the token is pasted into the ludus.yml file, running Ludus range deploy will execute the full, automated workflow. Ludus provisions the VMs, and Ansible installs the Elastic Agent, which then enrolls in Fleet and automatically pulls down the policy containing the Elastic Defend integration. This provides the rich EDR telemetry – kernel-level process, file, network, and registry events – from the moment the lab is born.
3.2 The Ludus YAML Configuration (ludus.yml)
Ludus provides the steps to deploy the GOAD range here. The configuration for the range is stored in the ludus.yml configuration file. For the GOAD range, it is located in ad/GOAD/providers/ludus/config.yml.
The full configuration in the appendix is an example based on a sample running configuration that merges a full GOAD lab (on VLAN 10) with the XZbot lab (on VLAN 20).
To deploy a customized version during installation, update the ad/GOAD/providers/ludus/config.yml file before running the goad.sh script in step 2.
git clone https://github.com/Orange-Cyberdefense/GOAD.git
cd GOAD
sudo apt install python3.11-venv
export LUDUS_API_KEY='myapikey'  # put your Ludus admin api key here nano ad/GOAD/providers/ludus/config.yml # customize the configuration here
./goad.sh -p ludus
GOAD/ludus/local > check
GOAD/ludus/local > set_lab GOAD # GOAD/GOAD-Light/NHA/SCCM
GOAD/ludus/local > install
Two key configuration options can be used to customize the range:
Global Variables: To simplify the config and avoid repetition, the Elastic Agent variables are defined once at the top level in a global Ansible.vars block and are inherited by all VMs.
The enrollment token determines the Elastic Agent policy used.
# ludus.yml
---
# --- GLOBAL ANSIBLE VARS (Simplification) ---
# Define Elastic agent vars once and apply globally
global_role_vars:
ludus_elastic_fleet_server: "<443>""""" 443>"""""" ’
‘””
“”
‘””
“”
“”
&
“”
“”&
“”
‘
“”
‘
“”
“”””
——
“”
“”‘
""“”‘
“”
‘
“”
“”“”””
“”
“”
- “”
- “”
- “”
- “”
‘“””
&
- “”””””“”
- “”“”
——
‘
“&”
&
- ‘””
- ‘‘
- “”‘
“”
‘’
‘
“”
""""""""'"""""""""""""""""""""""""""""""""""""" ‘